How To: Deploy a Plotly Dash app to the web using Heroku
I use Plotly’s Dash solution to create a range of useful data analysis, visualisation, machine learning etc applications for myself and clients.
Dash is great because it runs as a web app - the tool’s accessibility for non-technical stakeholders is often the hardest part of development, and a web app fills that gap perfectly.
Heroku offers a great free option to run small web apps, like Dash.
In this blog, I’ll succinctly run through the setup required to set up a Dash app in Heroku to make it available on the web.
Prerequisites
Create your Dash app
This is just your usual Dash app; if it runs in debug mode on your local computer, you should be pretty sweet.
Setup a Git repo
Heroku needs your Dash app to be in a Git repo to deploy it.
Use your solution of choice (GitHub, Gitlab etc).
Ensure you’ve committed your latest version.
Setup Heroku CLI
Follow all the instructions here to install Heroku CLI. You’ll use this to push your Git Repo into Heroku to deploy it.
Alternatively, you can deploy via a connection to Github; in this case, you don’t need to install Heroku CLI.
Prepare your Dash app
Check Dash config
If you want to avoid headaches:
- Your Dash app should be run from a file called
app.py -
app.runservershould be guarded to only run inmaini.e.:if name == ‘main’: app.run_server(debug=True)
-
Your
appandserverdefinition should look something likeapp = Dash( title=”Tab title” ) server = app.server
Optional: use dash-auth for basic auth
If you want to use basic auth to protect your web app, then this snippet will help.
Note: there are much more secure ways to do this. See Plotly’s documentation for more details.
import dash_auth
from decouple import config, Csv # helper for env files

user_pwd_csv = config('USERS', cast=Csv())
    user_pwd_pairs = dict()
    for user_pwd in user_pwd_csv:
        user, pwd = user_pwd.split(':', maxsplit=1)
        user_pwd_pairs[user] = pwd

    auth = dash_auth.BasicAuth(
        app,
        user_pwd_pairs
    )
Then create a .env file (add it to .gitignore!) or define in your environment variables the USERS variable as follows:
USERS=username:password,user2:another_password
Add the required Procfile
- Create a new file in the root of your directory called
Profile(no extension) -
In
Procfile, add the following content:web: gunicorn app:server
Note: app:server needs to reference the app and server you defined in your Dash app earlier.
Update requirements
If using pipenv, run this in your terminal: pipenv dash-auth gunicorn
If using pip, then run: pip install dash-auth gunicorn
Add runtime.txt
- Create a new file called
runtime.txt -
Add the following content to
runtime.txtpython-3.9.10
(Change the version number if necessary – this is the version of Python that Heroku will use when running your app. Matching it to your local development environment will avoid most issues)
Setup Heroku
Login to Heroku
Navigate to herokuapp.com and login.
Create Heroku app
Click New then Create new app as show below.
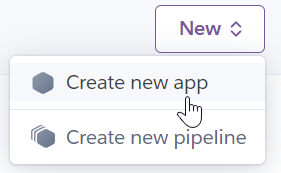
Give your app a cool app name, then click Create app
Do Heroku CLI setup
- Ensure you’re logged in by running
heroku login - Navigate to your Git repo containing your dash app
- Execute
heroku git:remote -a YOUR-APP-NAME-HEREto add Heroku as a remote to your repo. - Deploy your app by running
git push heroku master
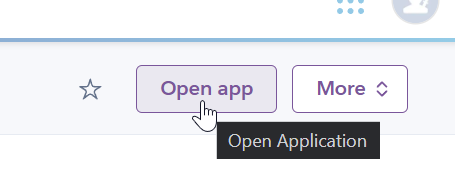
Check if deploy worked
In Heroku, in the Overview tab you’ll find an Open app button at the top right.
Click Open app and check if your Dash app works.
Note: if you’re using dash-auth for basic auth, you’ll first need to define your environment variables in Heroku under the Settings tab; they’re called Config Vars.
Heroku provides each app a unique URL you can share. This is usually in the format of your-app-name-here.herokuapp.com.
Debug if necessary
You can view the logs from your Heroku Dyno by executing heroku logs --tail in your project folder.
Common problems include:
- Missing or wrong Procfile or runtime.txt files
- Local environment variable missing in Heroku config vars
- Your Dash app references data that isn’t available to Heroku (e.g. a file locally on your desktop).
- You must either commit this file to the repo, or make it available e.g. via CDN and then download it over HTTP or similar.
Success!
If all went well, your Dash app should be publicly available. Now go forth and spread your data analytics!
Extra credit: setup custom domain
Under Settings in the Domains section, you can click Add domain and define a subdomain (or root domain) to make your Dash app available under.
If I wanted to host a Dash app at dashapp.curtiswest.com, I’d enter dashapp.curtiswest.com in the Add domain screen.
Heroku will provide me with a DNS target, which I can define as a CNAME record in my domain’s DNS settings. From there, my app will be accessible under my custom domain 😊